Christmas Gift Topper - 12 Days of Gift Toppers
*This post contains affiliate links. For more information, please see my disclosure page here.
Are you ready for some fun, handmade gift topper inspiration? I recently featured a fun series on Instagram and Facebook showcasing 12 Days of Gift Toppers to inspire you to add a little extra whimsy to your gift wrapping this Christmas season!
I had so much fun with this series! Honestly, this series really inspired me to up my gift wrapping game, and now I am excited to include some of these in my own gift wrapping this year!
Today I thought it would be fun to do a recap of the 12 Days of Gift Toppers series.
But first, I put together a roundup of some of the items that I used furing these 12 days of gift toppers that you can use at home for your gift wrapping. Please enjoy the list HERE.
Before I showcase the gift topper pictures, please enjoy this video highlighting all gift topper tutorials.
Please enjoy this video highlighting all of the gift topper tutorials!
Christmas Gift Topper: Day 1 & Day 2
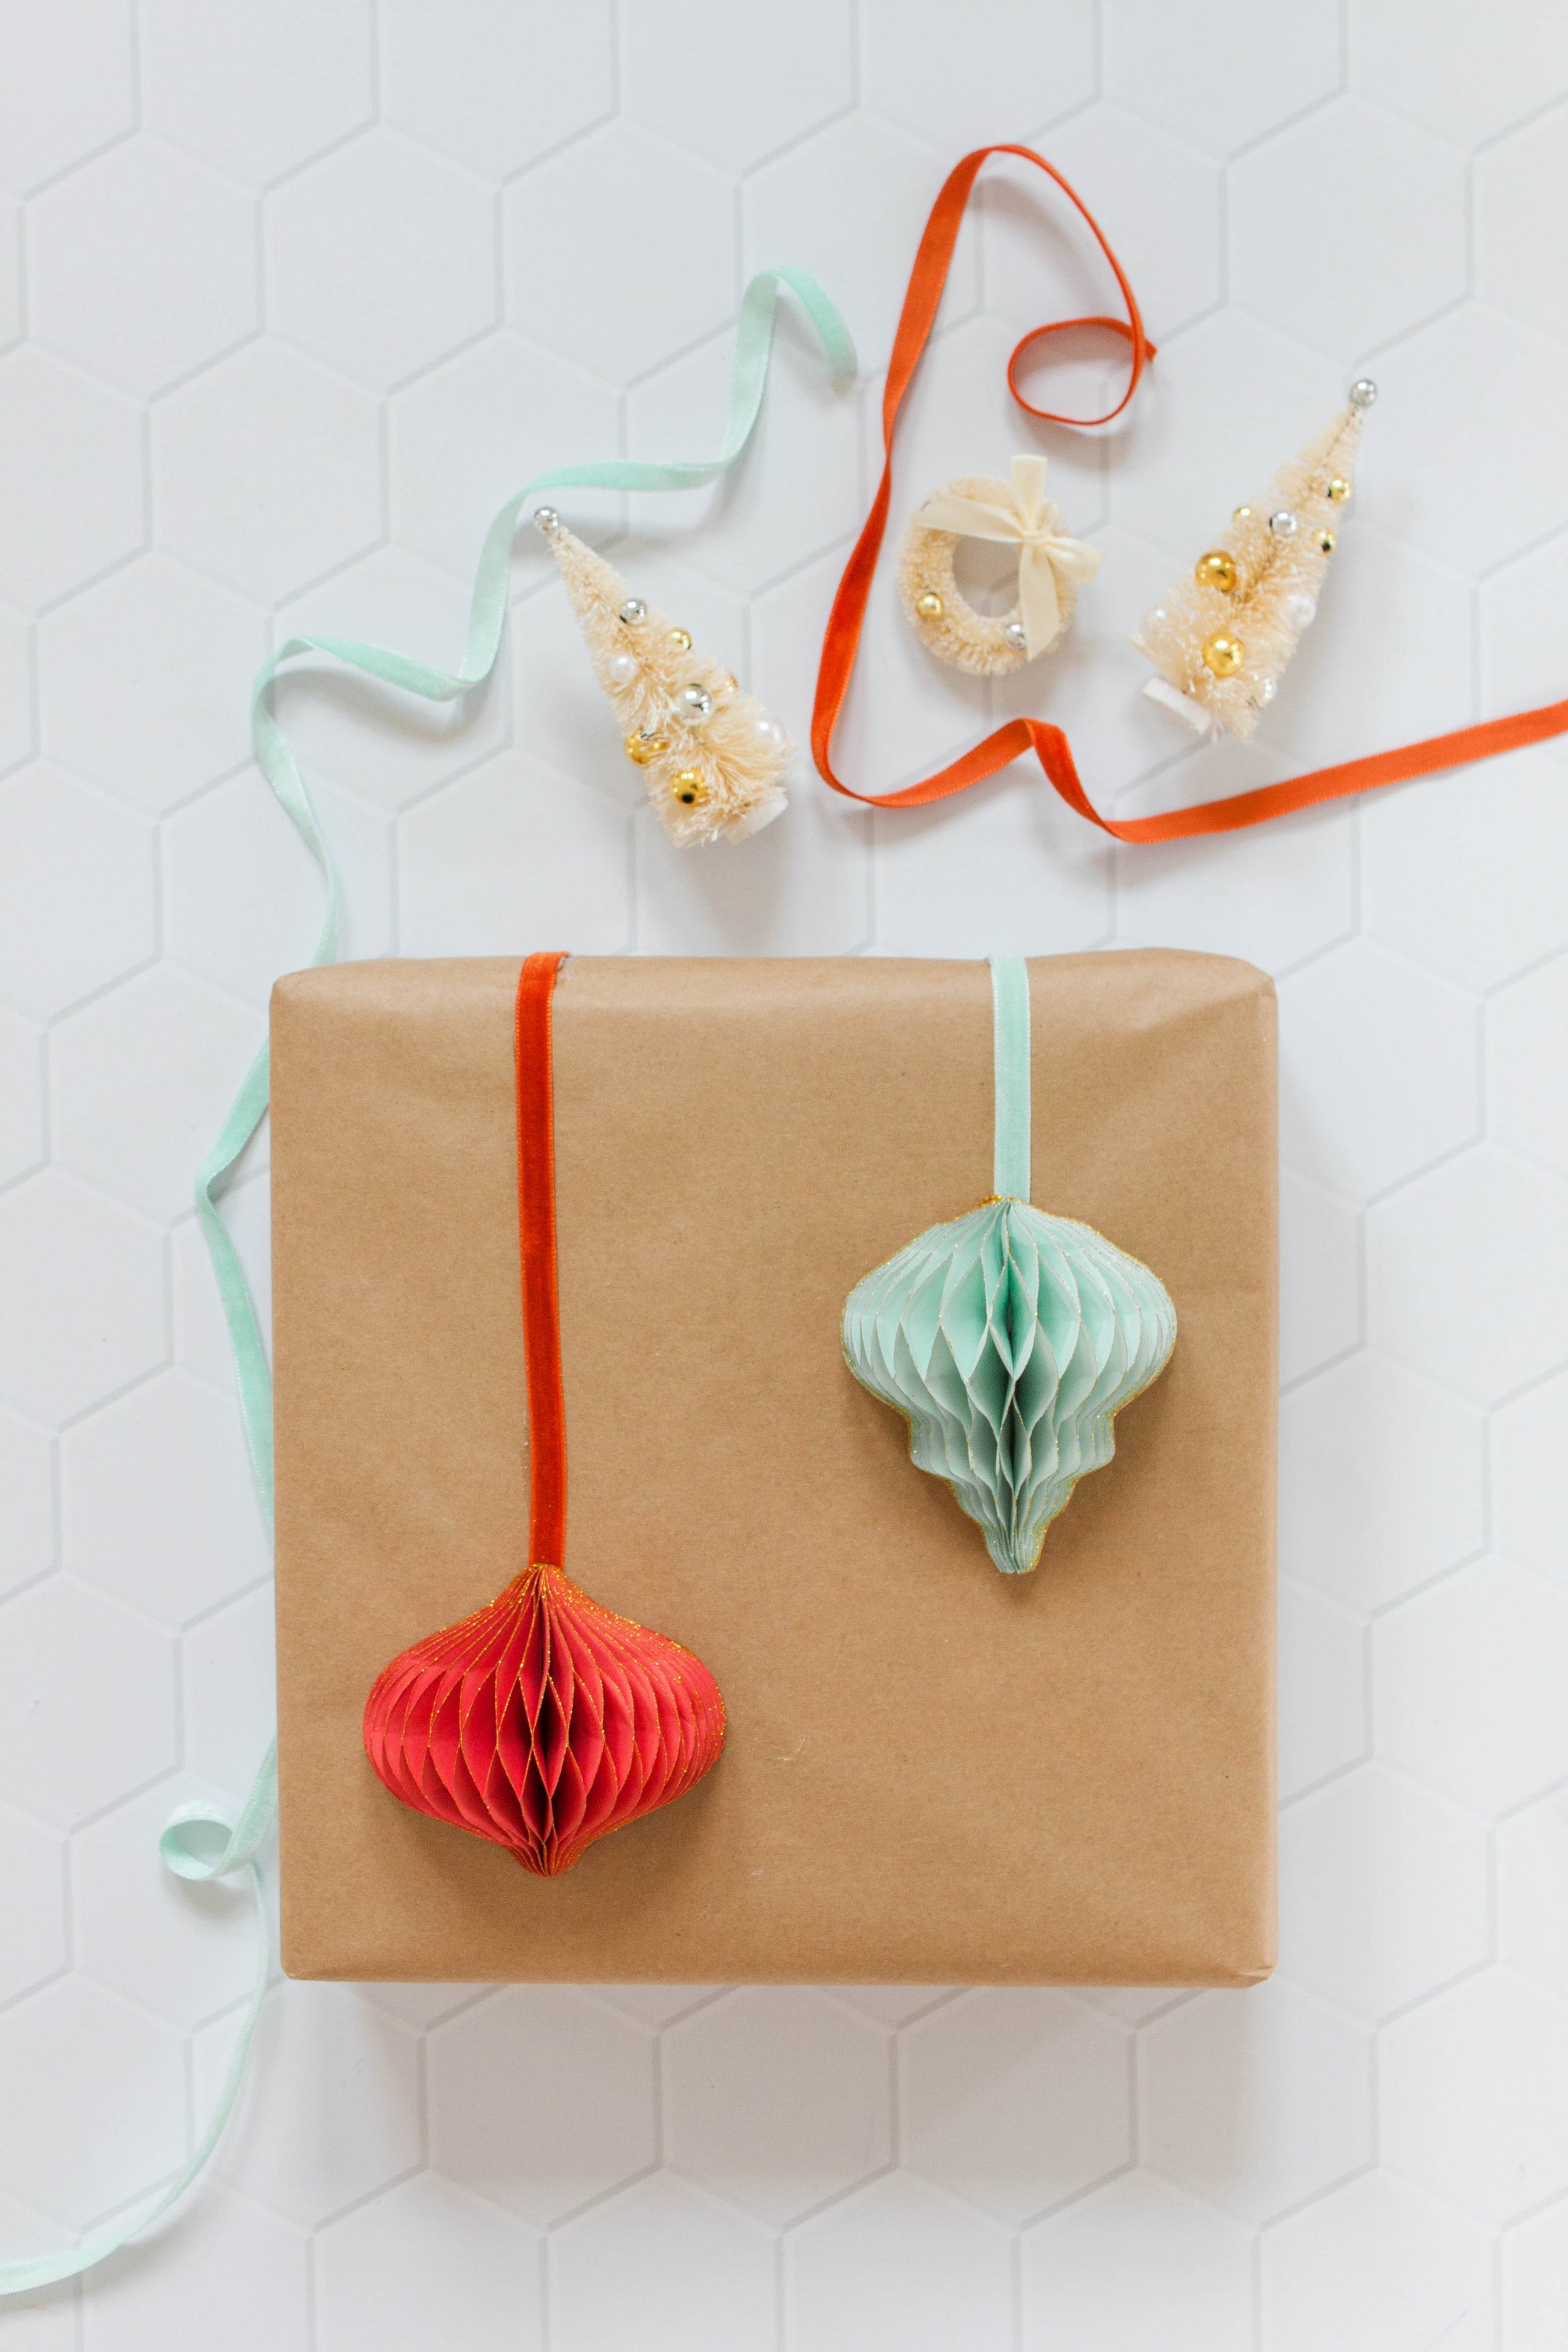
Day 1: DIY Miniature Honeycomb Ornament.
Day 1 was a simple one! I wanted to showcase these adorable miniature honeycomb ornaments I found on Amazon. All I did was wrap a present in Kraft paper, then I hot glued a thin velvet ribbon (in the same color) and the honeycomb directly to the wrapping paper.
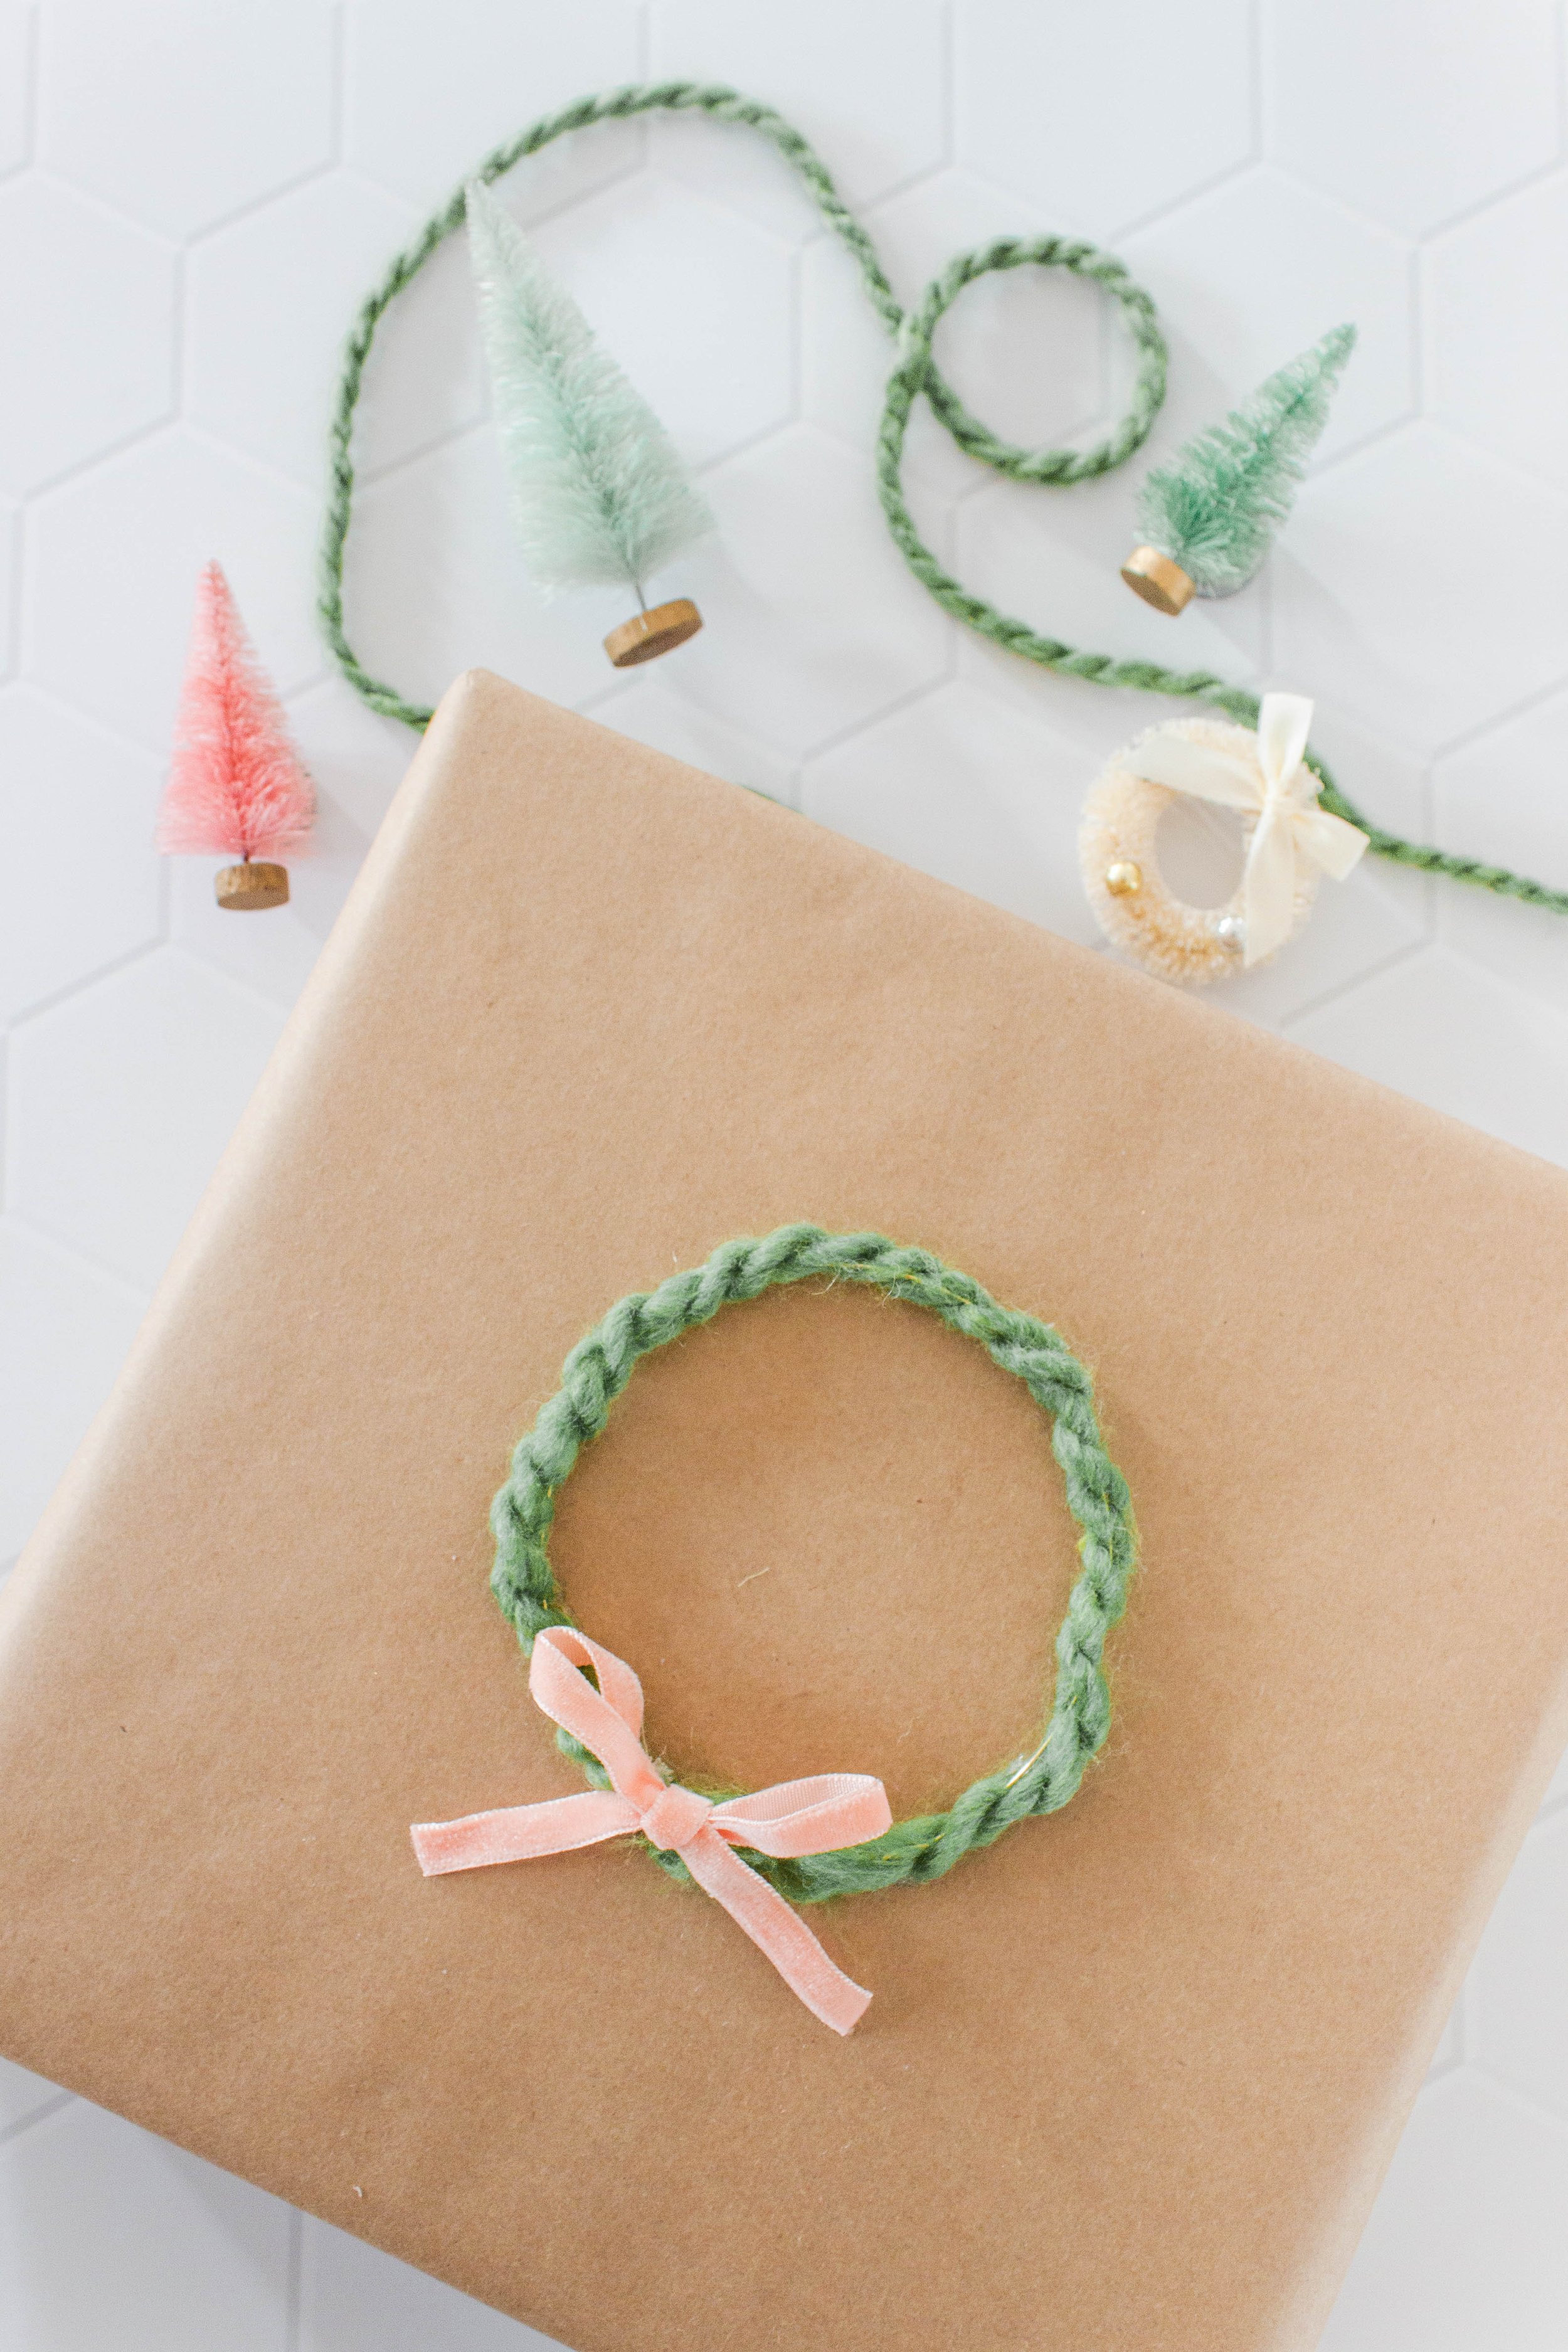
Day 2: DIY Miniature Yarn Wreath.
I love making wreaths, especially this time of the year. For Day 2 I made a miniature version out of yarn.
Cut a small circle of wire, then thread the wire through a chunky piece of green yarn until the yarn covers the wire. Some of the wire will show, and don’t stress about that! Then, hot glue the wreath to a present wrapped in kraft paper. Finish the wreath with a cute bow!
Christmas Gift Topper: Day 3 & 4
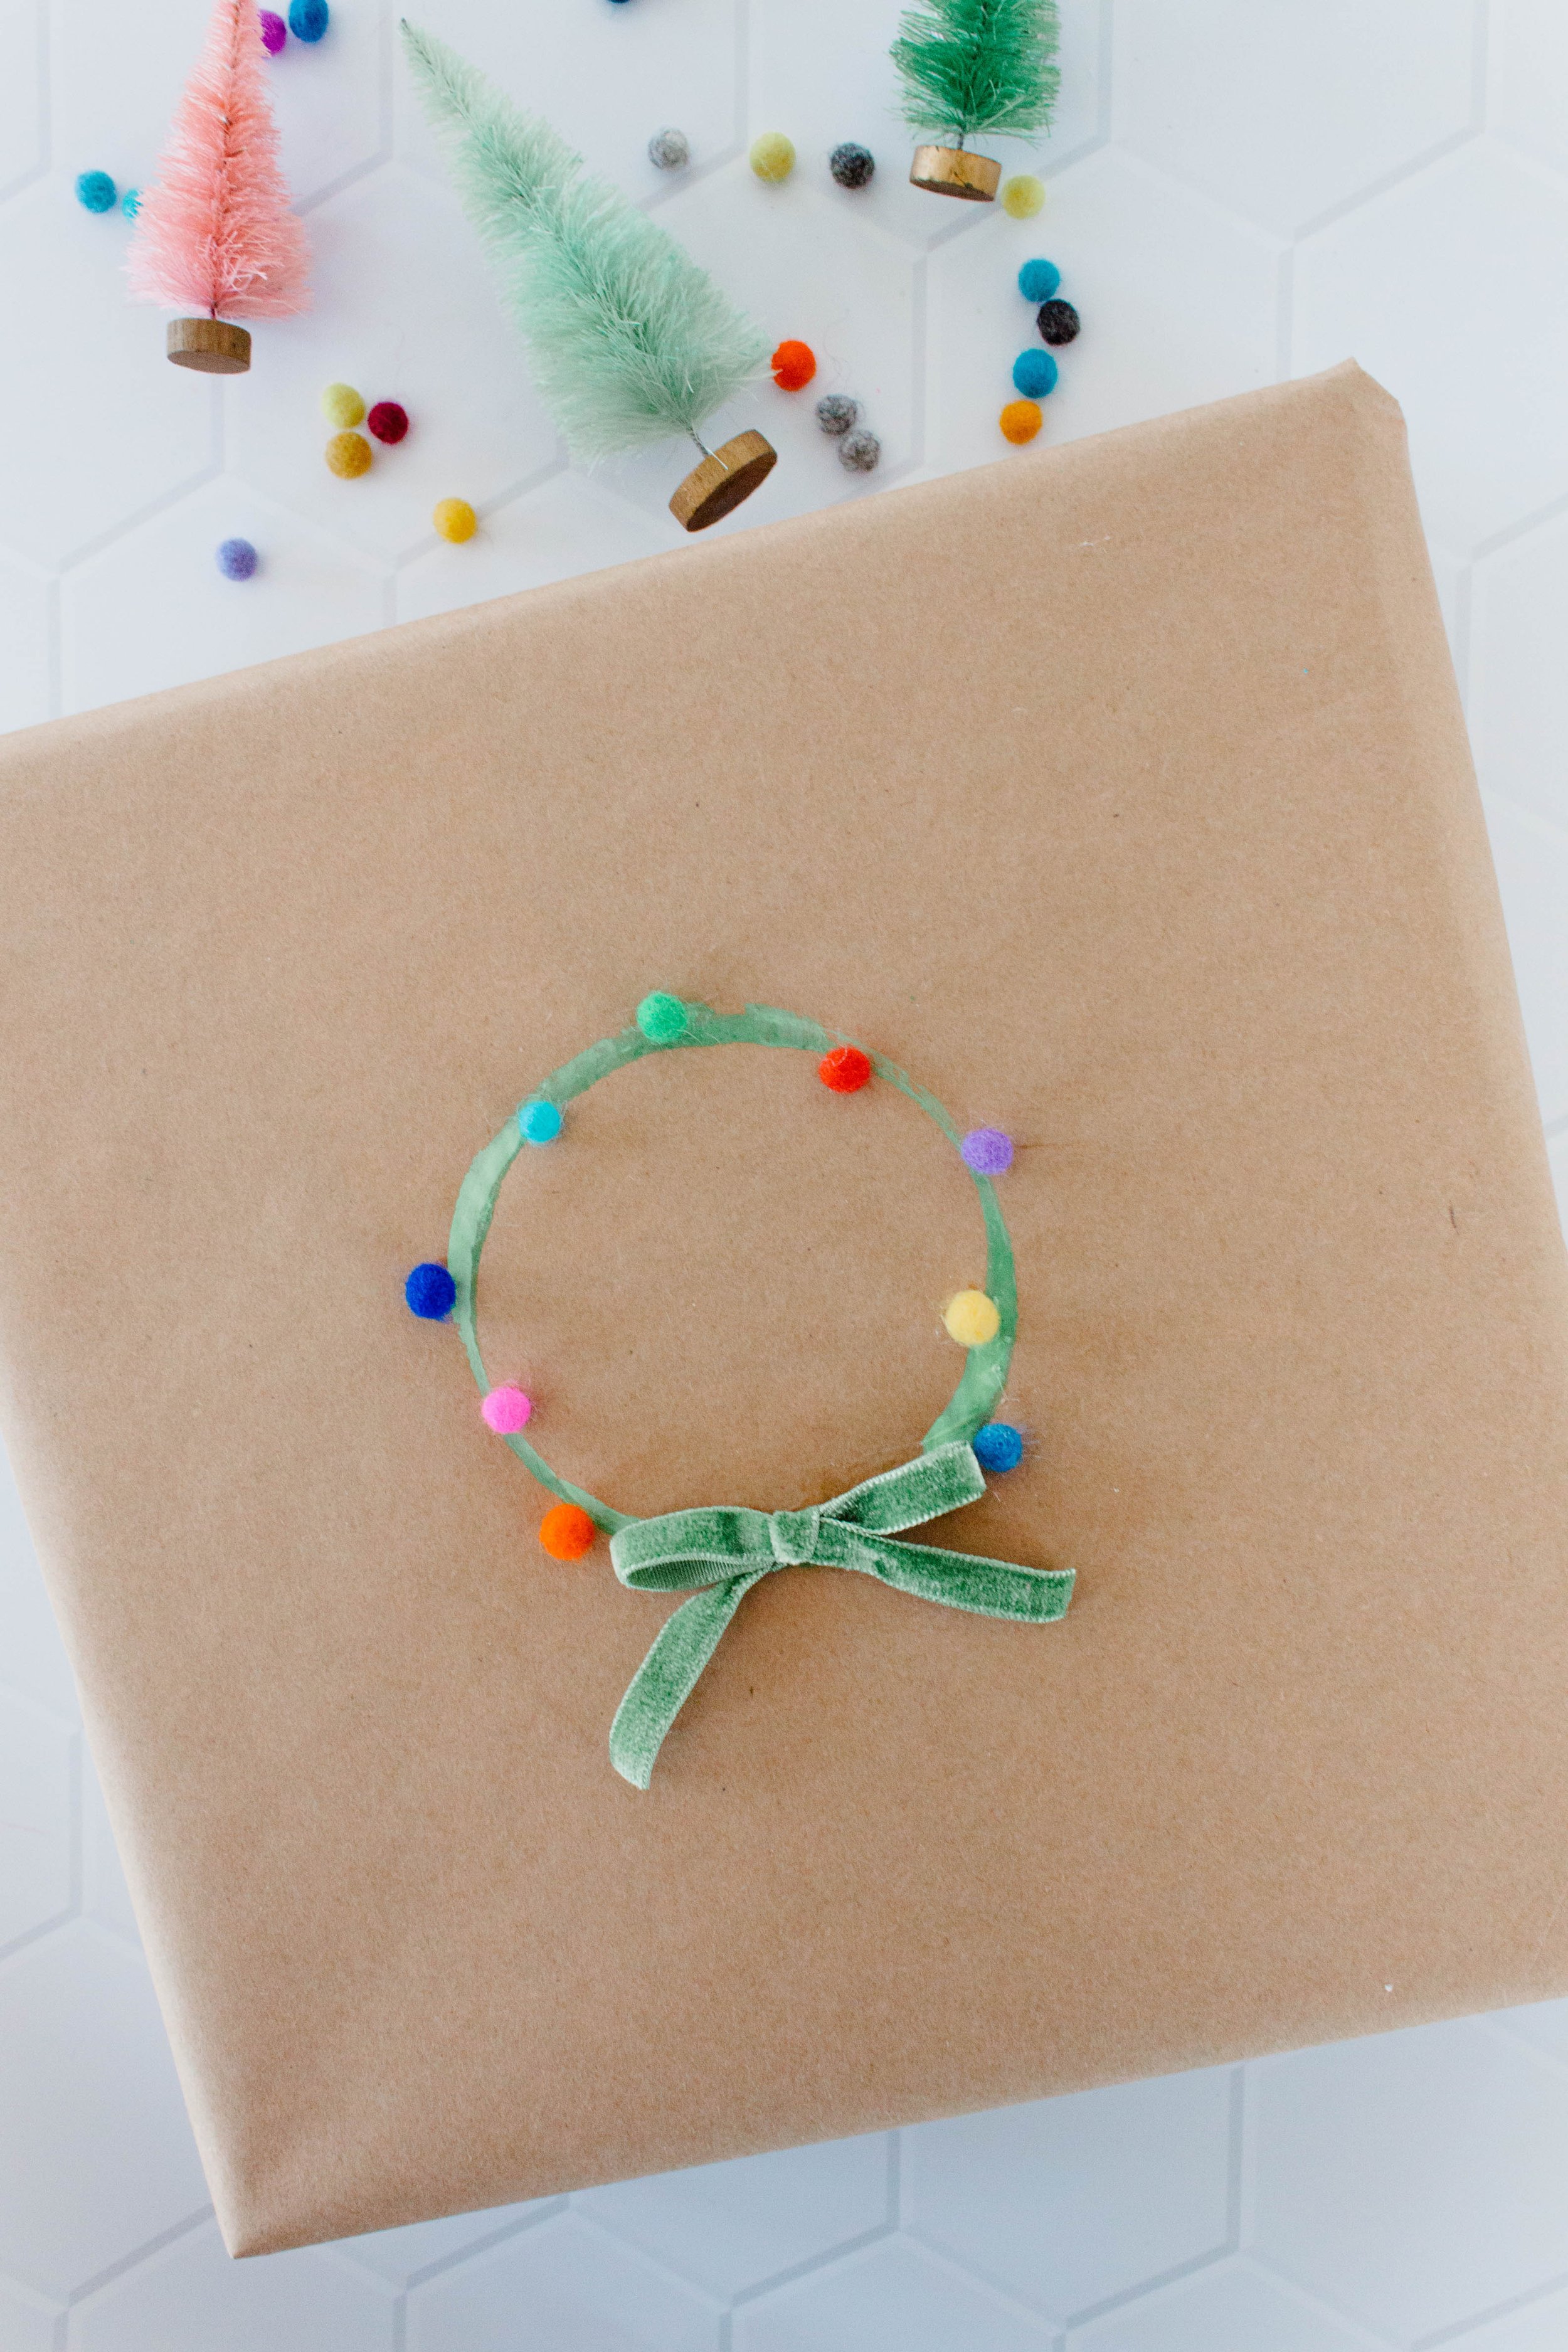
Day 3: Miniature Painted Pom Pom Wreath.
Today I’ve got another miniature wreath for you because I LOVE them! The first step is to add some craft paint to the top of a cup. Then, stamp it to a present wrapped in Kraft paper. *If you want, double up on the Kraft paper so the paint doesn’t go through the packaging. *Wiggle the cup a little to add texture to your wreath! Next, use Beacon’s 3-in-1 glue to add miniature felt pom poms. I found these on Amazon and they are so cute!!! Finish the wreath with a cute bow!
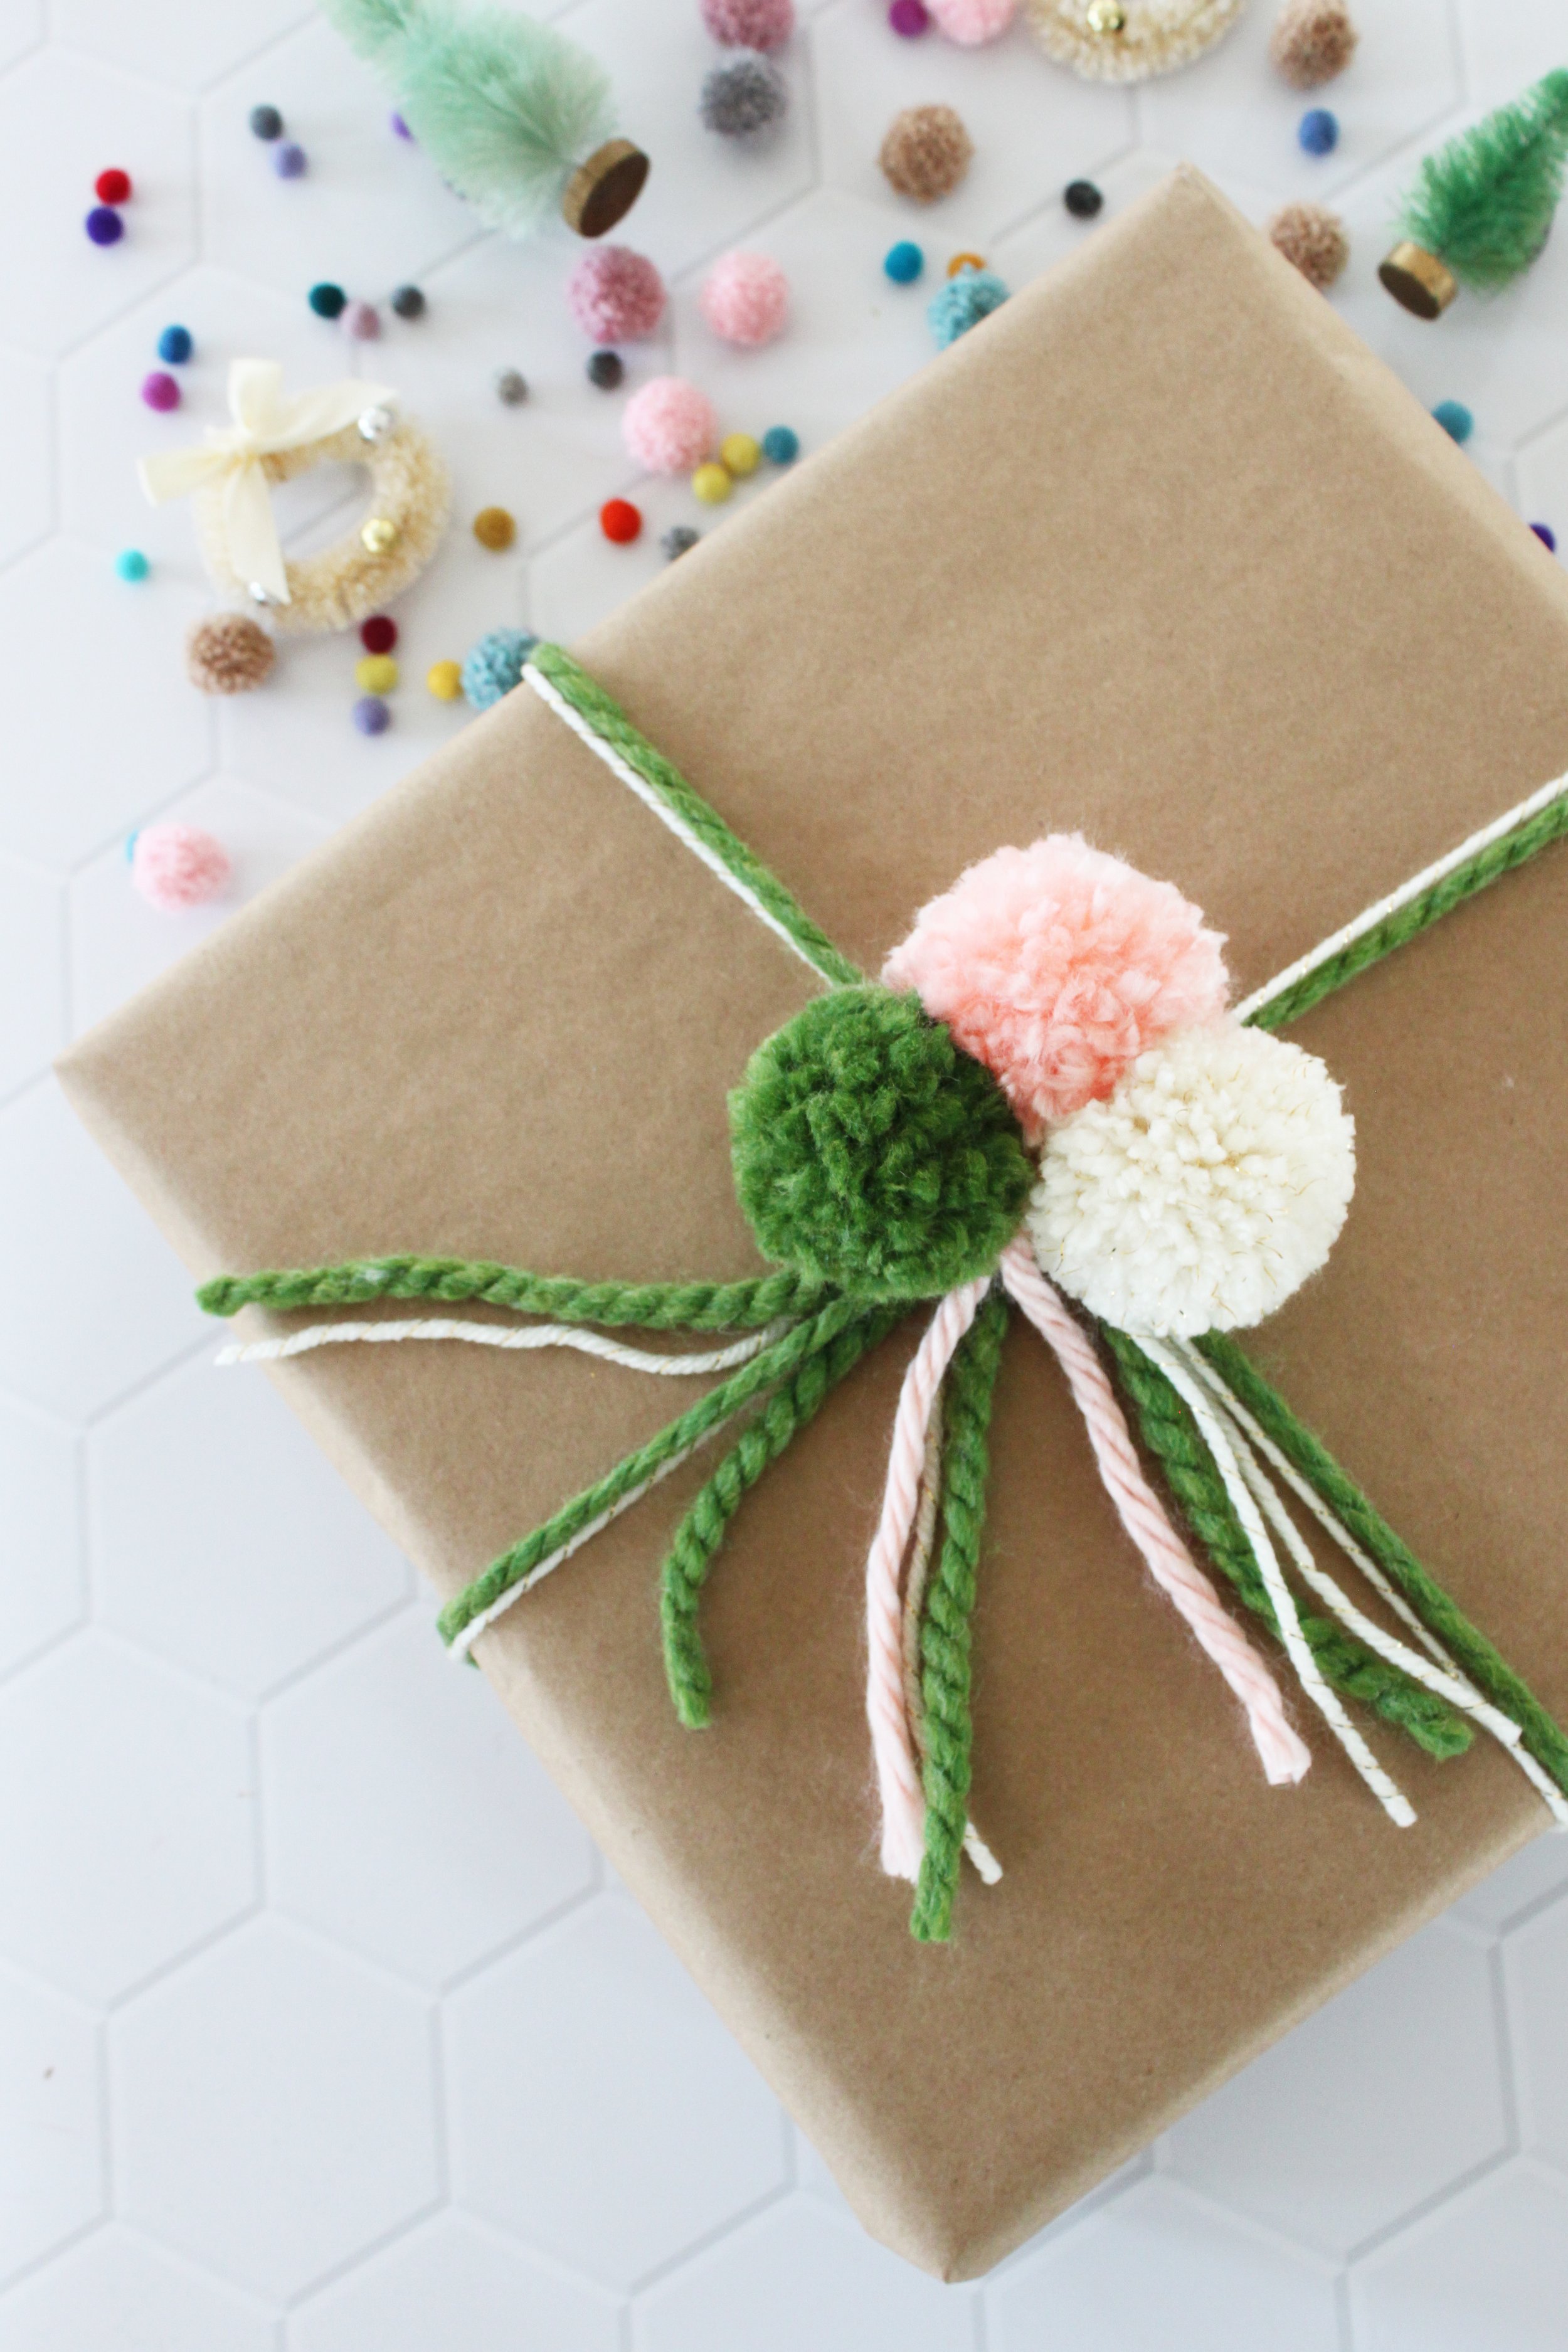
Day 4: DIY Pom Pom Topper.
I LOVE making pom poms and I love gifting them as gift toppers. Also, yarn can an inexpensive alternative to ribbon, plus you can use whatever colors you want to fit your color palette! The first step is to use Clover’s Pom Pom maker to make some adorable pom poms. I used three for my topper, but you can use as many or as little as you want. Keep the tails long as you will use them to tie to the present. Then, tie the yarn to the present, and attach the pom poms to the yarn on the gift! Trim the pom poms.
Christmas Gift Topper: Day 5 & 6

Day 5: How to Tie a Bow.
Bows and velvet are having a moment and I am so here for it! I have been featuring a lot of velvet bows in my tutorials, so I thought it would be great to showcase how I tie a bow for a gift topper. The first step to create a bow is to hold a loop of ribbon in your left hand. Then use your right hand to wrap the same ribbon around the first loop (keep the right side of velvet to the front). Then, bring the ribbon around the back and to the front and through. Adjust accordingly until you are happy with your bow. Then, hot glue the ribbon and bow directly to your present!
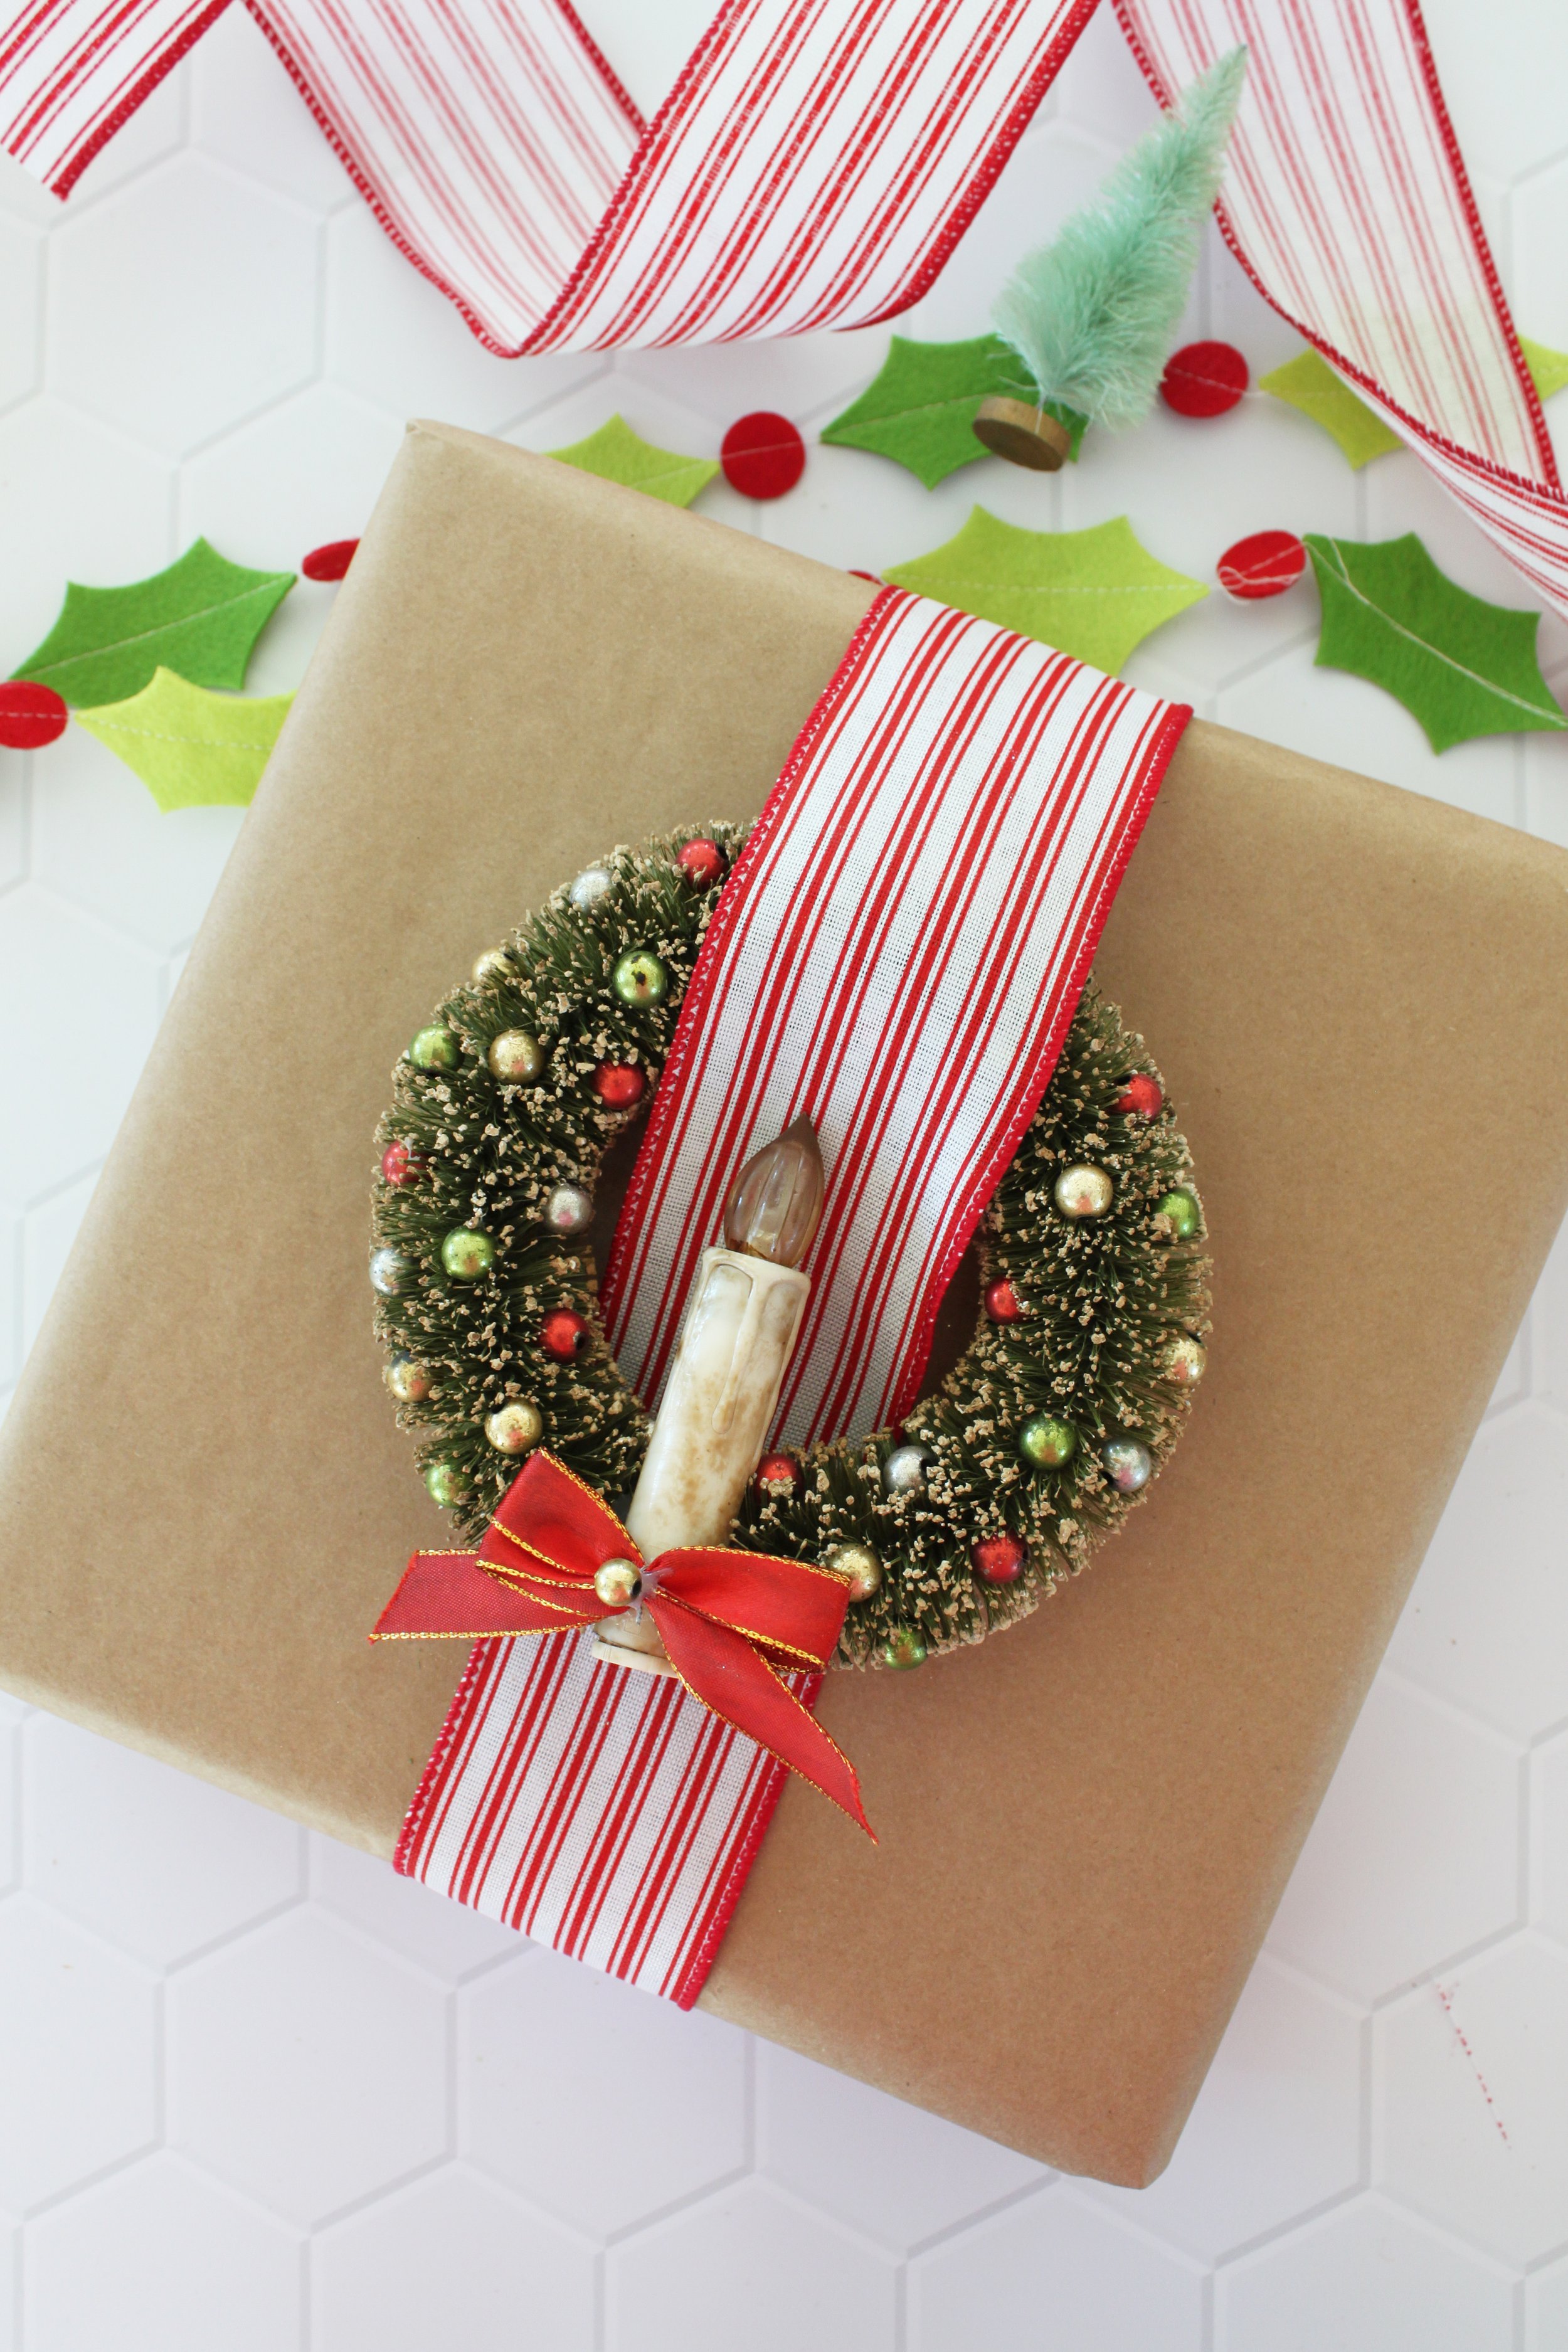
Day 6: Vintage Ornament Gift Topper.
Today is a really simple one! When I go thrifting I love looking for vintage ornaments that remind me of someone special, and using them as gift toppers. Use a beautiful complimentary ribbon to attach the ornament to the present.
Christmas Gift Topper; Day 7 & 8

Day 7: DIY Tassel Topper.
Today I thought it would be fun to use Clover’s tassel maker to make a fun tassel as a gift topper. I wrapped two different types of yarn around the tassel maker 15 times each. I love the monochromatic look that I created with a lot of texture from the yarn! But you can choose whatever color your heart desires. Once the tassel is complete add some yarn to a present wrapped in Kraft paper, then tie the tassel onto the yarn on the present.
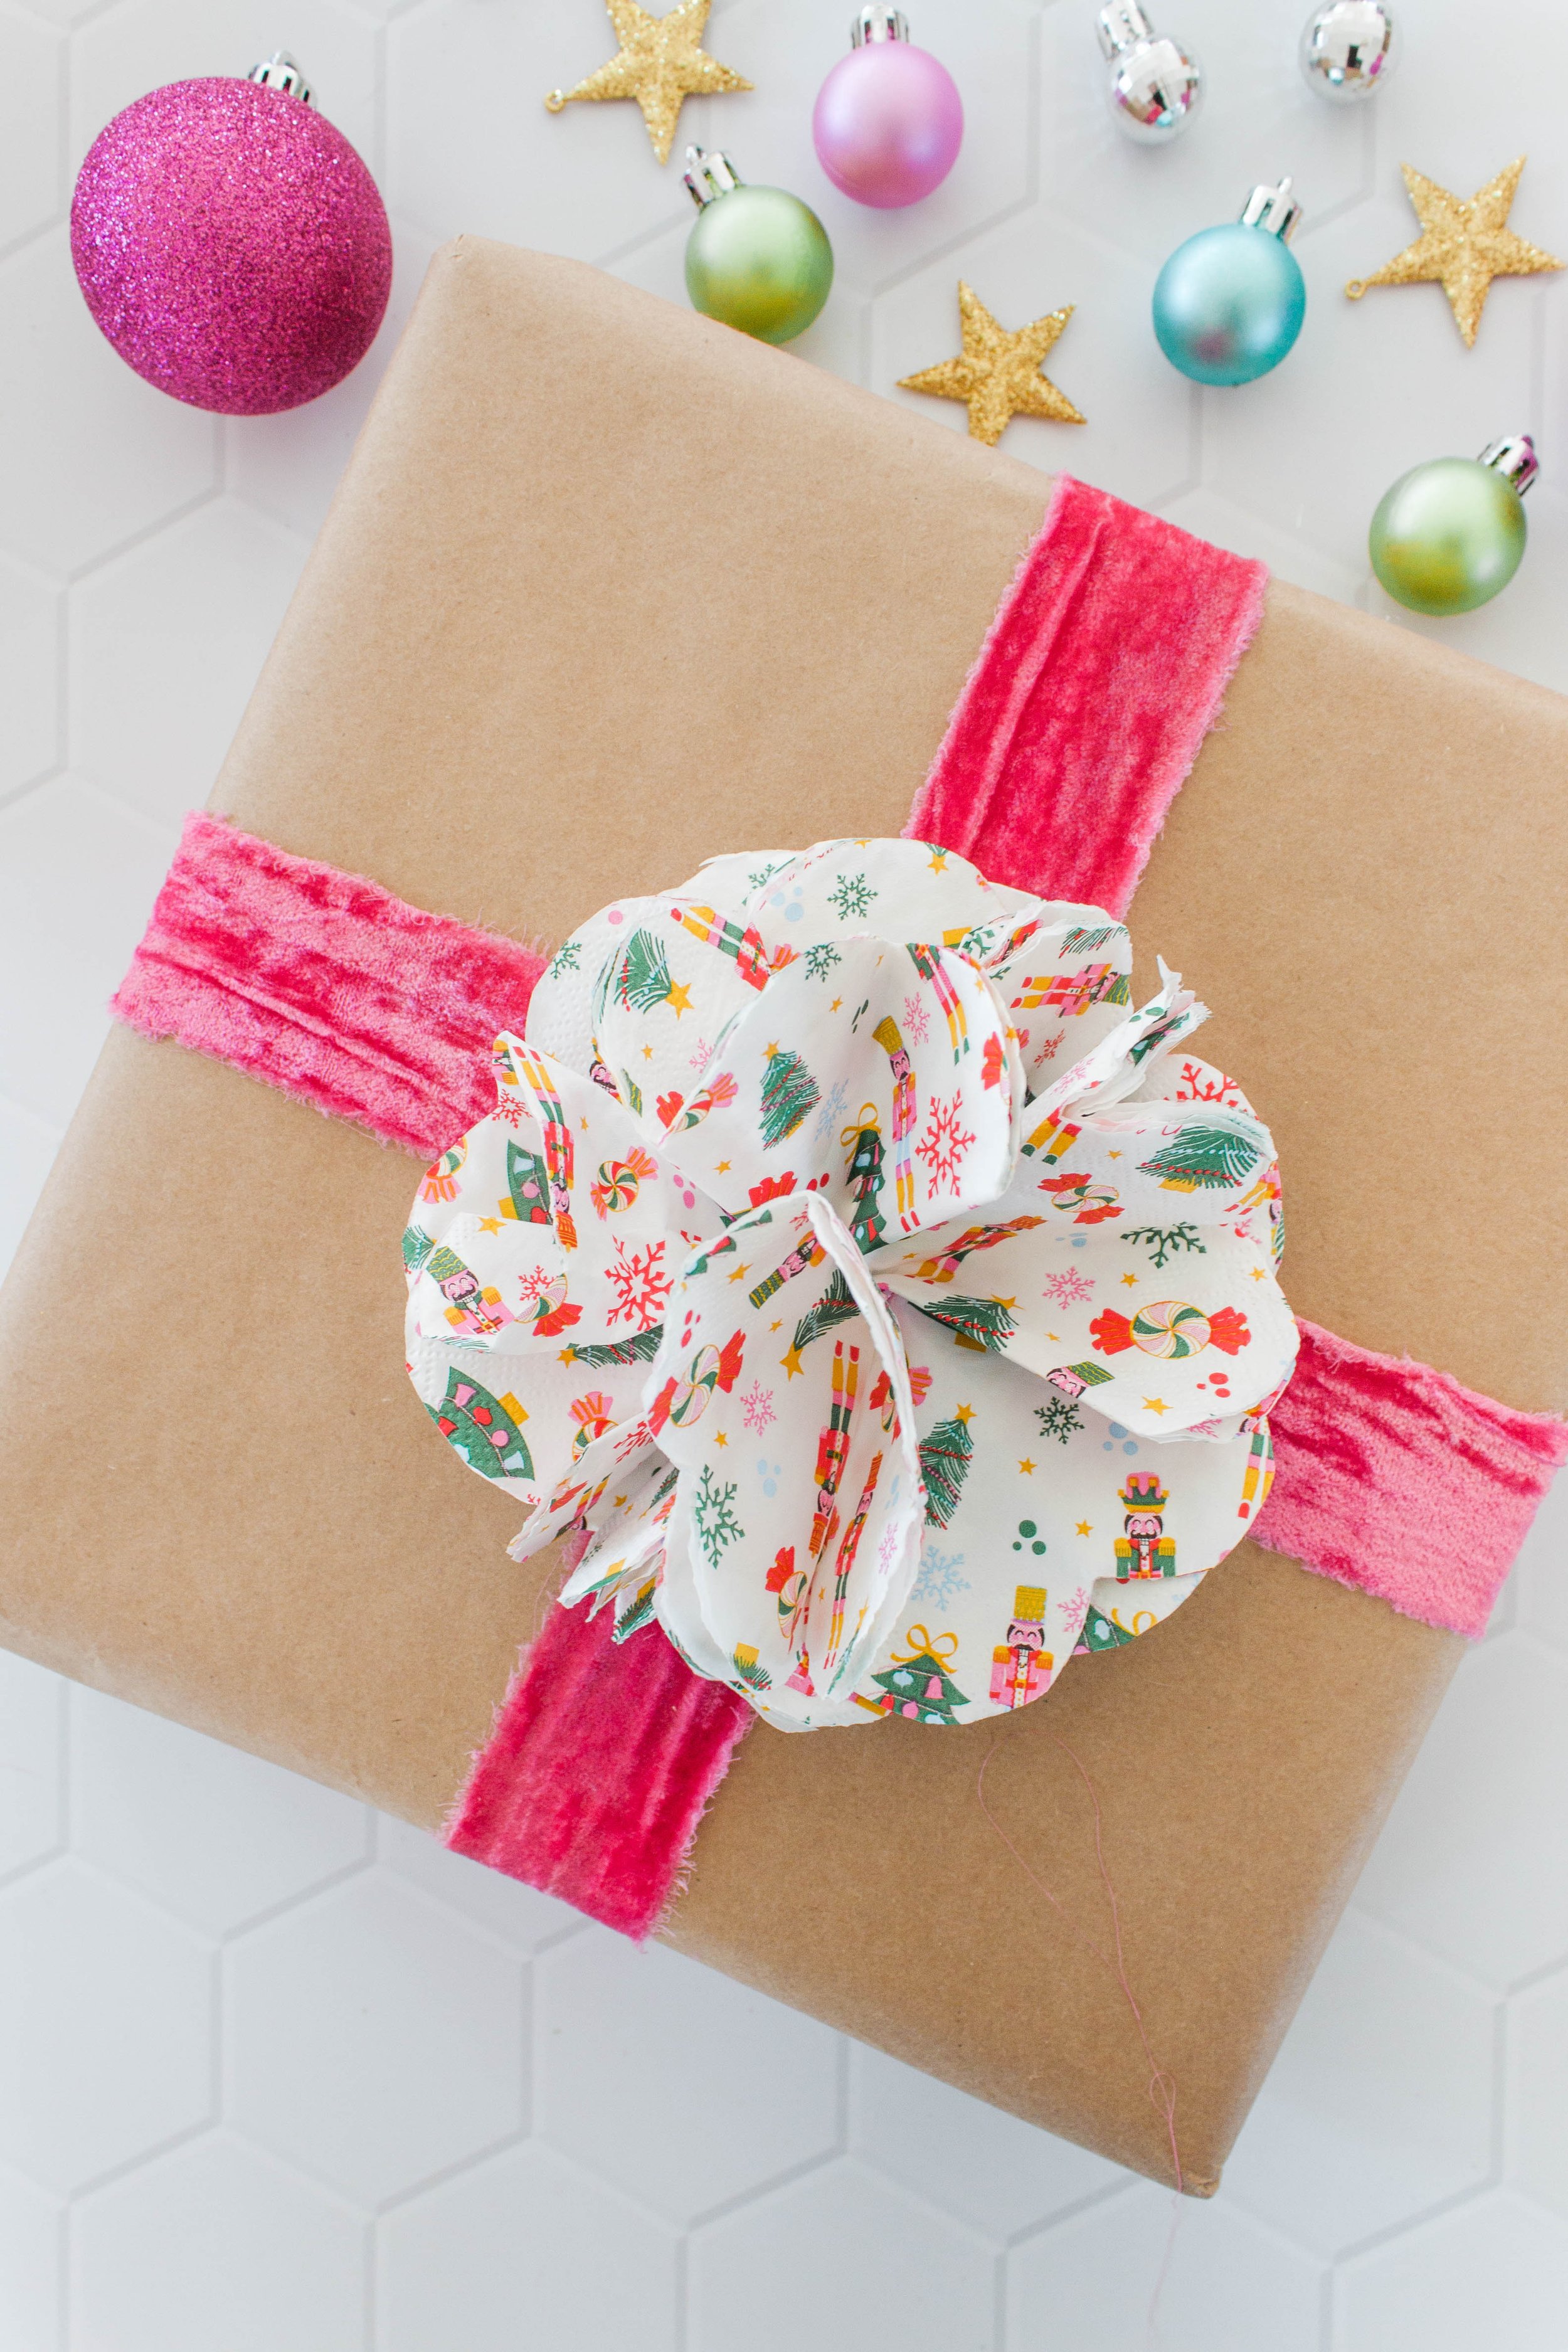
Day 8: Paper Napkin Flower Topper.
I found these adorable paper nutcracker napkins from Wal Mart, and I knew they make the cutest paper flower to act a gift topper. The first step is to cut the napkin in half, then use Clover’s Flower Frill Template to create the paper flower. I used 4 paper napkins in total to make this cute flower! (8 halves). I love how these flowers turned out, and I love that you can use wrapping paper or paper napkins to create this charming gift topper! Add a fun pop of color with the ribbon, then hot glue the paper flower to the ribbon.
Christmas Gift Topper: Day 9 & 10
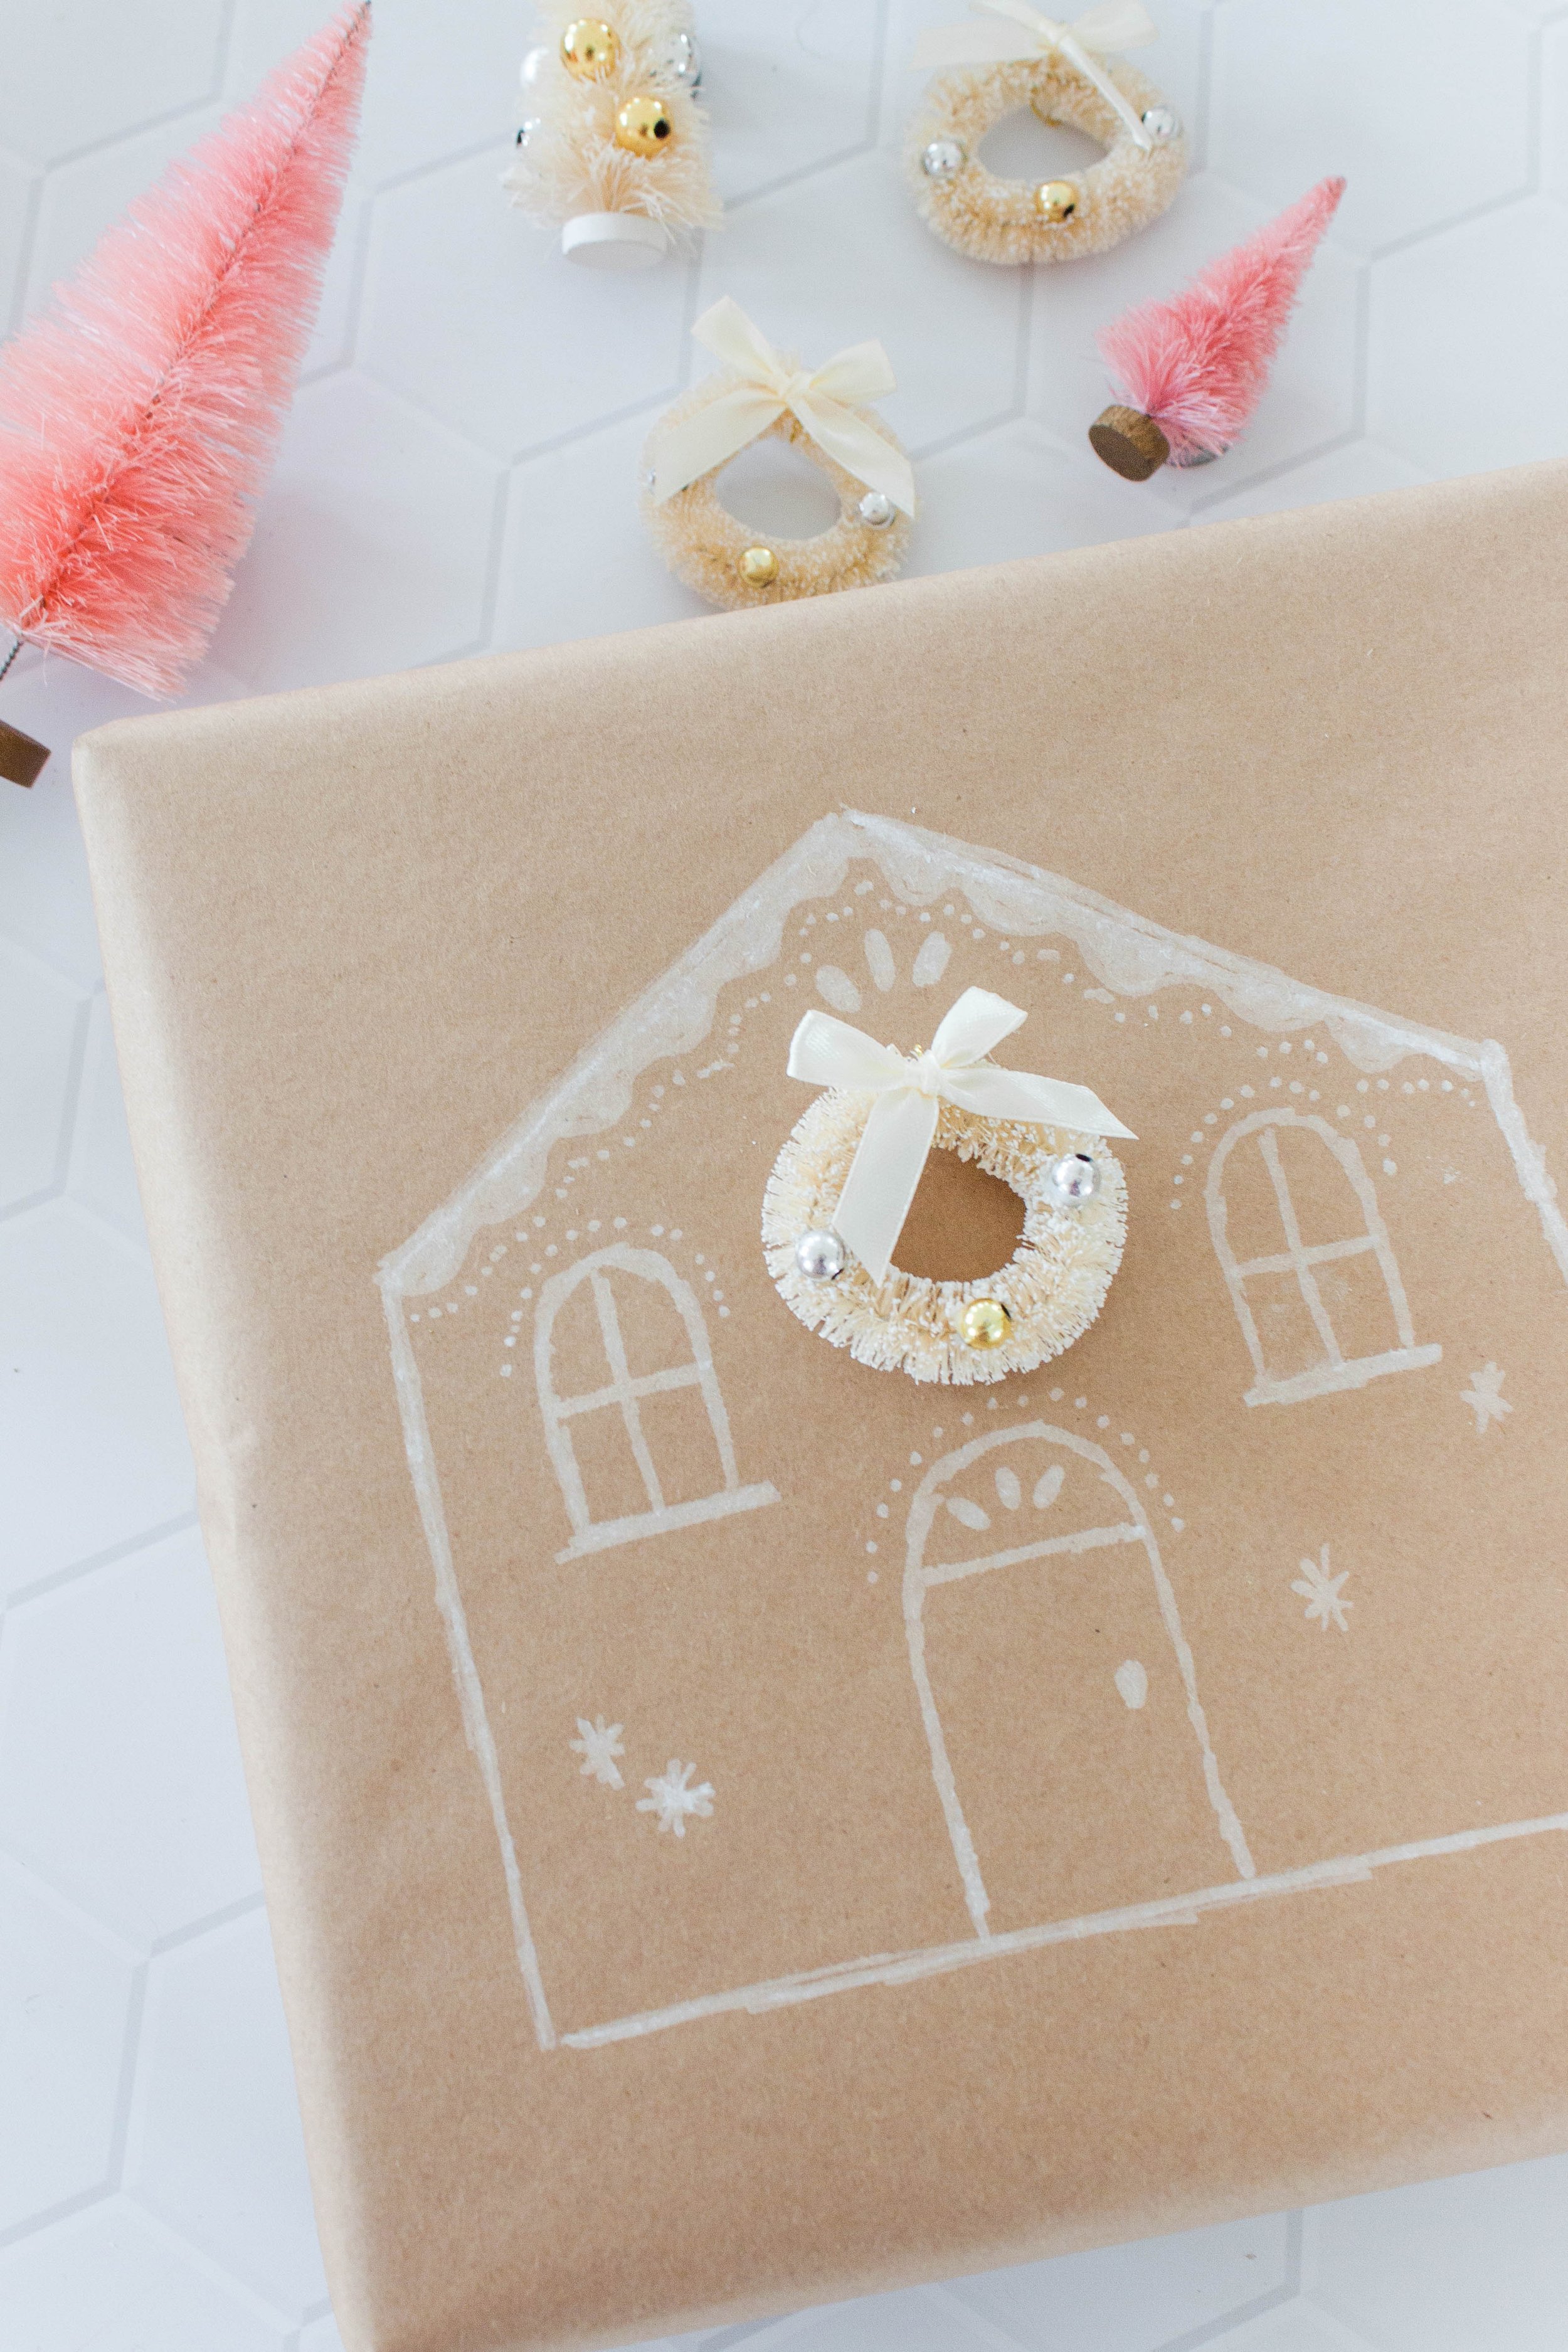

Day 9: DIY Gingerbread House Drawing.
Today’s gingerbread inspired house is a fun one! You can even get your children or grandchildren involved! The first step is to draw a gingerbread house onto a present wrapped in Kraft paper with a white paint pen. Don’t overthink this step. The lines don’t need to be perfect. Actually, it is better if they aren’t as that adds to the whimsy of the piece. Then, add fun details to the house like dots, and circles. Then, finish it off with a cute miniature decorative element. I used Beacon’s 3-in-1 to glue these adorable miniature bottle brush wreaths from Michaels!
Day 10: Miniature Cedar Wreath
I love today’s project because it was inexpensive. I foraged some cedar leaves from my parent’s house, but you can use any greenery you have on hand! The first step is to create a miniature wreath out of the wire. Then attach the cut cedar to the wreath with wire one at a time. Layer the next piece of cedar over the last, and continue until the wreath is covered. Hot glue the wreath to a present wrapped in Kraft paper, and finish the wreath with a a beautiful velvet bow.
Christmas Gift Topper: Day 11 & 12
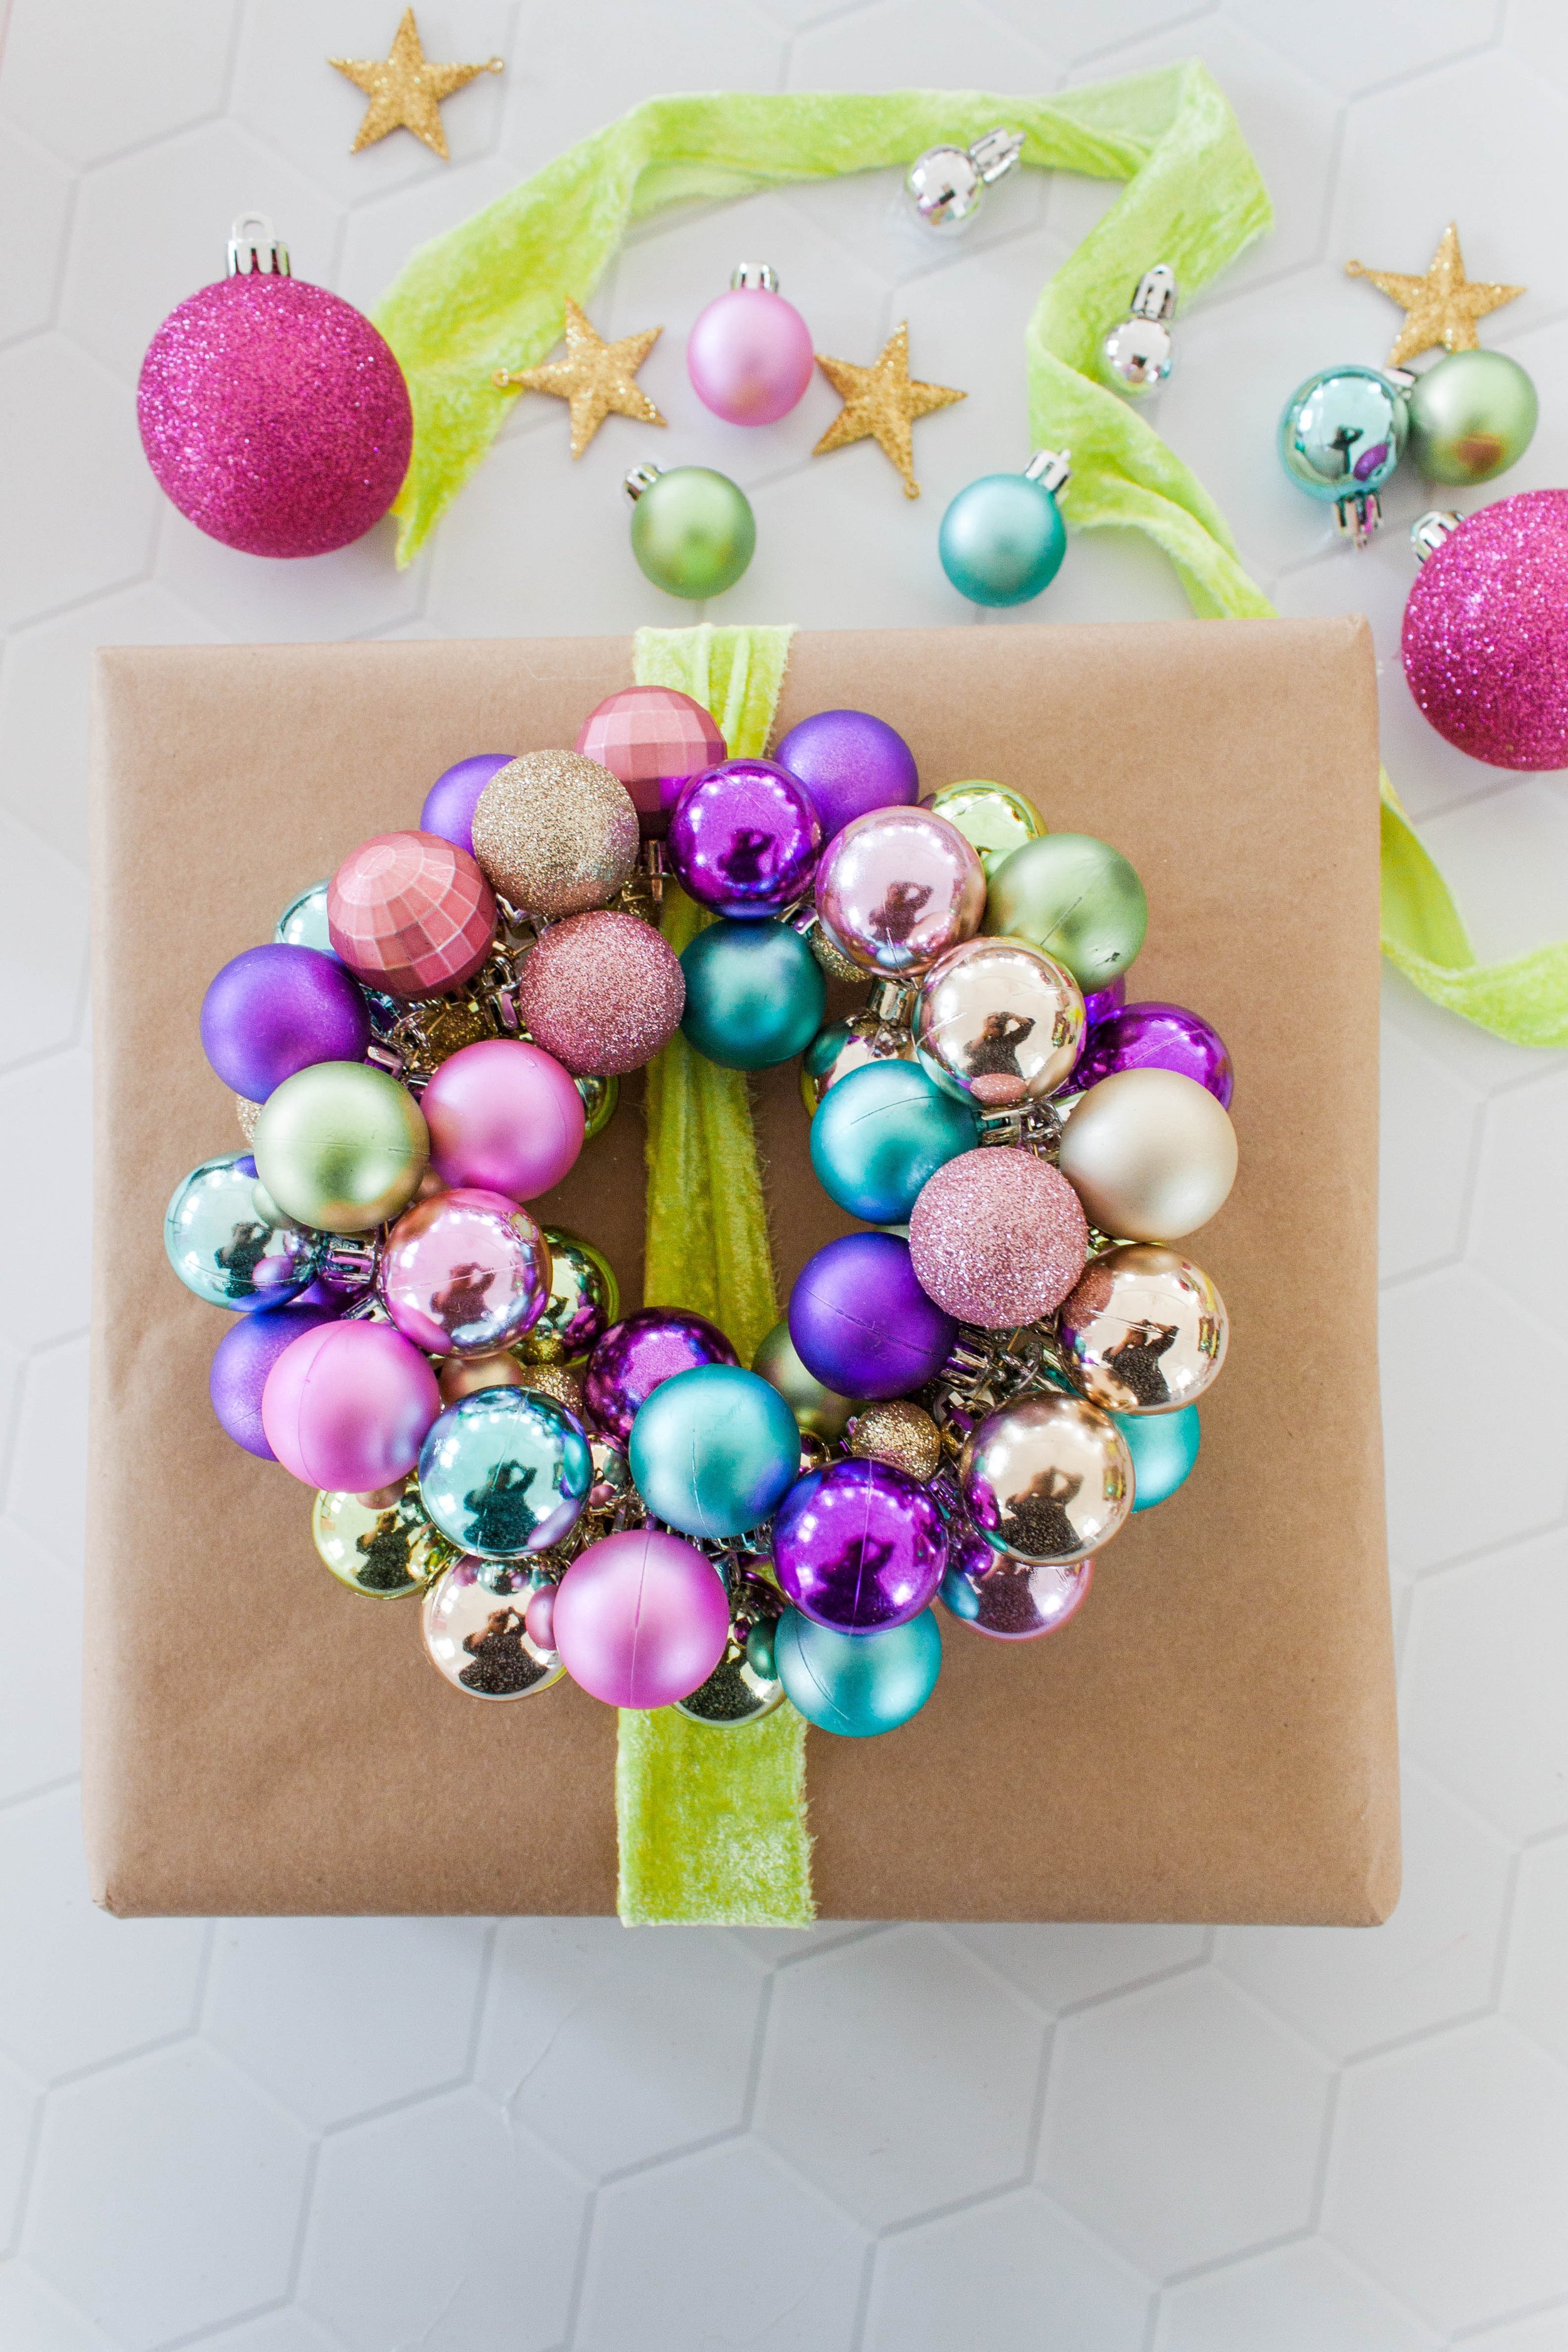
Day 11: Miniature Ornament Ball Wreath.
This miniature ornament wreath may be my favorite project. It can be a present in itself! String miniature ornaments onto a piece of wire. Continue to change up the colors, sizes, and textures of the ornaments. Then, cut the wire and twist it together to create a miniature wreath! Use a beautiful piece of ribbon to hold the wreath onto a present wrapped in Kraft paper.
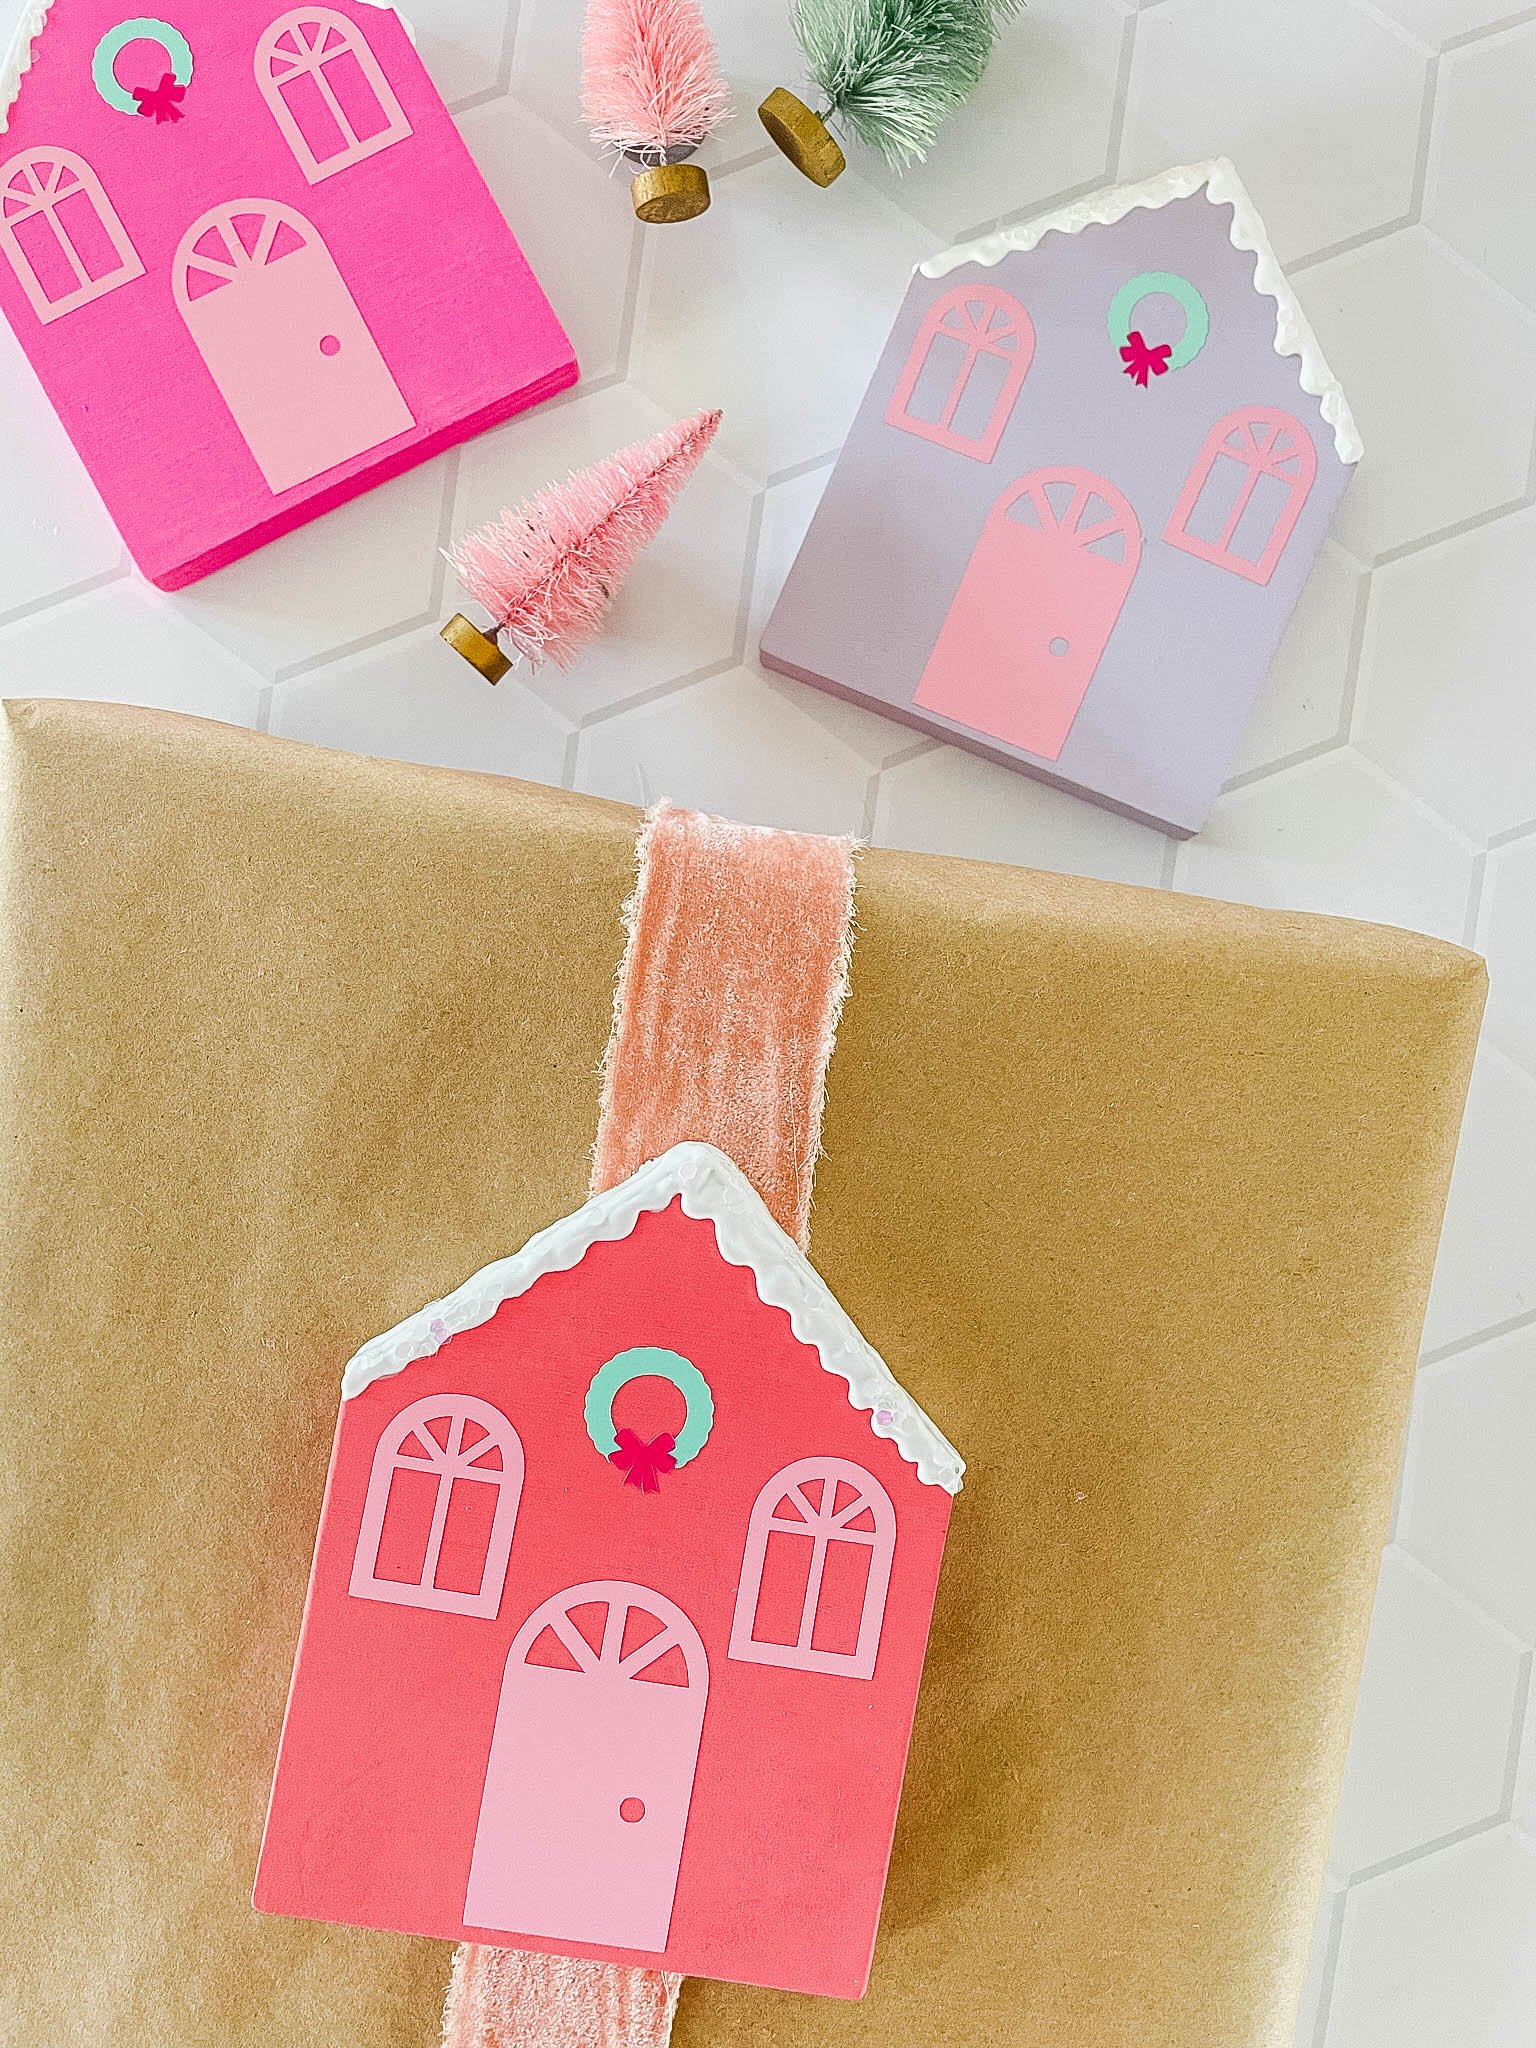
Day 12: Miniature Christmas House.
Today is the last day and so I wanted to go big! I was gifted these adorable wooden houses from Woodpeckers Crafts and so I knew they would make the cutest Christmas house! The best part about these is that they make the sweetest gift on their home, and they stand on their own! Start by painting the house with craft paint. Then, use your Cricut to add fun decals like doors, windows, and wreaths! How cute is that tiny bow! Lastly, add some puff paint to the top of the house with some chunky glitter to act as snow. Then attach the house to present wrapped in Kraft paper with strong tape.
Thank you so much for following along! I hope you now feel inspired to add some fun whimsy to your gift wrapping this holiday season!